WINDOW 11

How to Fix ReadyBoost Tab Missing in Windows 11 (Not Showing Issue)

5 SOLUTIONS
JUNE 02, 2025

The missing ReadyBoost tab in Windows 11 is often misunderstood as a system error, but it's frequently an intentional design decision by Microsoft. ReadyBoost was created to help older computers with traditional hard drives and limited RAM by using USB flash drives as supplementary cache storage.

Deepak Yadav
Deepak Yadav

Primary Drive

Your PC should be running on a traditional HDD, not an SSD.

RAM Size

This feature is most useful if your system has 4GB of RAM or less.

SysMain (Superfetch)

This service must be enabled and running.

Advertisement

Enable the SysMain Service

6 STEPS EASY 2 MIN

1/5

METHOD
Method 1
Overview

The SysMain service (formerly SuperFetch) is essential for ReadyBoost functionality. Without it running, the ReadyBoost tab won't appear.
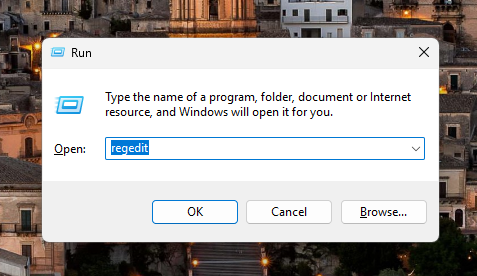
Method 1 of 5
Next Method

Open Services

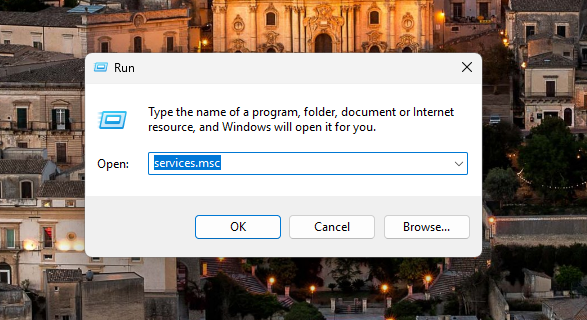
Press Win + R → Type services.msc → Press Enter

Method 1 of 5
Step 1 of 6

Find SysMain

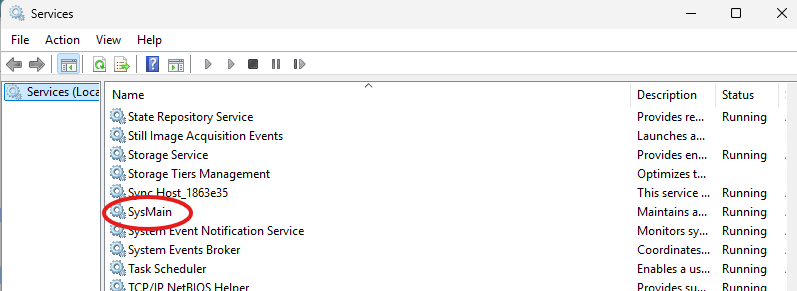
Scroll to “SysMain” in the list

Method 1 of 5
Step 2 of 6

Open Properties

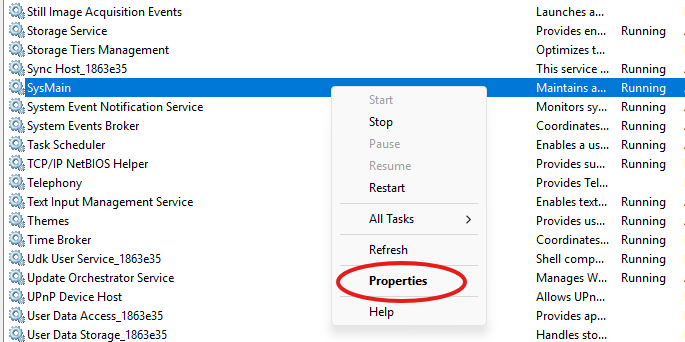
Right-click → Properties

Method 1 of 5
Step 3 of 6

Enable the Service

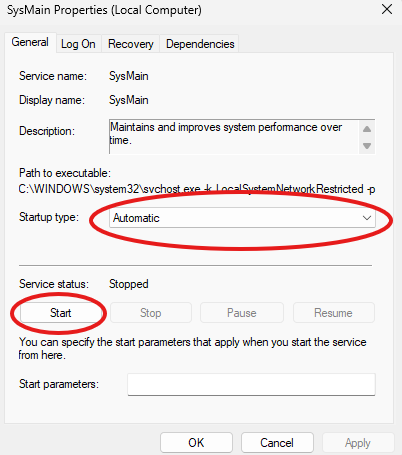
Set Startup type: Automatic

If Status = Stopped, click Start

Method 1 of 5
Step 4 of 6

Save and Reboot

Click Apply → OKRestart your computer
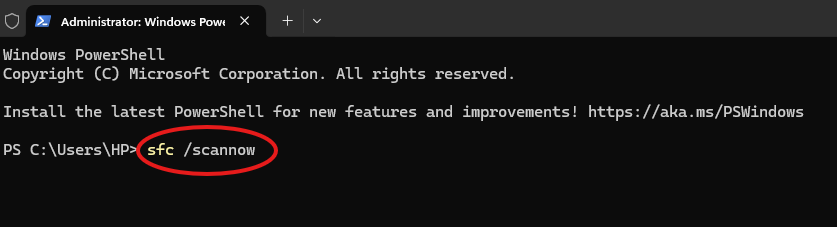
Method 1 of 5
Step 5 of 6

Alternative via CMD

Run as Admin:sc config "SysMain" start=auto & sc start "SysMain"

Tip: Always restart after enabling SysMain to properly initialize the service.

Method 1 of 5
Step 6 of 6
Advertisement

Run System File Checker Scan

3 STEPS EASY 2 MIN

2/5

METHOD
Method 2
Overview

Corrupted system files can prevent the ReadyBoost tab from displaying properly. The SFC scan can repair these issues.

Method 2 of 5
Next Method

Open Admin Terminal

Right-click Start → Windows Terminal (Admin)

Method 2 of 5
Step 1 of 3

Run DISM First

DISM.exe /Online /Cleanup-image /Restorehealth

Wait 15–30 mins

Method 2 of 5
Step 2 of 3

Run SFC

After DISM: sfc /scannowLet it complete

Restart Your PC

Tip: Running DISM before SFC gives the best results. SFC repairs based on DISM’s cleanup.

Method 2 of 5
Step 3 of 3
Advertisement

Update USB Drivers and Windows

3 STEPS EASY 2 MIN

3/5

METHOD
Method 3
Overview

Outdated or corrupted USB drivers can prevent Windows from recognizing your flash drive's ReadyBoost capabilities.

Method 3 of 5
Next Method

Update Windows

Go to Settings → Windows UpdateClick Check for updatesInstall all updates

Method 3 of 5
Step 1 of 3
Step 2

Uninstall USB Drivers

Press Win + X → Select Device Manager

Expand Universal Serial Bus controllersRight-click each USB Root HubUninstall deviceDon’t check “Delete driver software”

Method 3 of 5
Step 2 of 3

Restart Your PC

Windows reinstalls USB drivers

Tip: Download latest chipset & USB drivers from the official website (Dell, HP, etc.) — avoid third-party tools.

Method 3 of 5
Step 3 of 3
Advertisement

Format USB Drive Correctly

2 STEPS EASY 2 MIN

4/5

METHOD
Method 4
Overview

An improperly formatted USB drive won't be recognized for ReadyBoost eligibility.

Method 4 of 5
Next Method

Insert and Find USB

Plug in USB → Open File Explorer (Win + E) → Go to This PC

Method 4 of 5
Step 1 of 2

Right-click & Format

Right-click USB → Format...Choose File system: NTFS (if >4GB) or FAT32Keep Quick Format checked

Start Formatting → Confirm and proceed

Formatting erases all data: Back up first. Use NTFS for large drives to enable ReadyBoost.

Method 4 of 5
Step 2 of 2
Advertisement

Registry Edit (Advanced)

3 STEPS EASY 2 MIN

5/5

METHOD
Method 5
Overview

This method should only be used as a last resort and by experienced users, as incorrect registry changes can damage your system.

Method 5 of 5

Open Registry Editor

Press Win + R → Type regedit → Press Enter

Method 5 of 5
Step 1 of 3

Navigate to:

HKEY_CLASSES_ROOT\Drive\shellex\PropertySheetHandlers

Method 5 of 5
Step 2 of 3
Step 3

Create New Key

Right-click PropertySheetHandlersNew → Key

Name it:{55B3A0BD-4D28-42fe-8CFB-FA3EDFF969B8}

Close Editor & Restart

Caution: Backup registry or create a restore point before changes. This forces the tab to show but won’t make ReadyBoost work on incompatible hardware.

Method 5 of 5
Step 3 of 3

Modern Alternatives to ReadyBoost

Image

Upgrade to SSD: Faster boot, loading, and responsiveness than ReadyBoost

Add More RAM: Reduces use of slow virtual memory Ideal for multitasking

System Optimizations: Disable startup apps, update drivers, and reduce visual effects