WINDOWS 11

How to Change the Sound Output in Windows 11

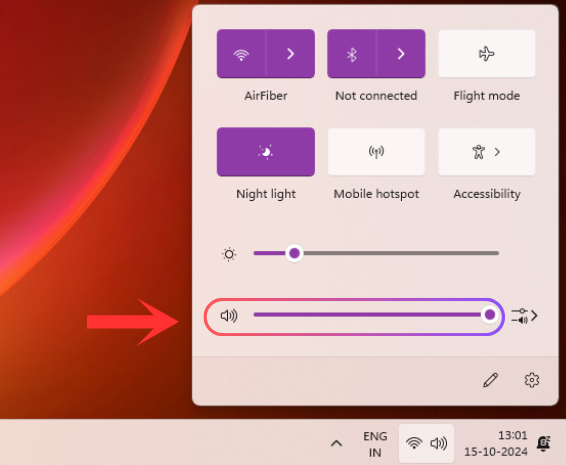
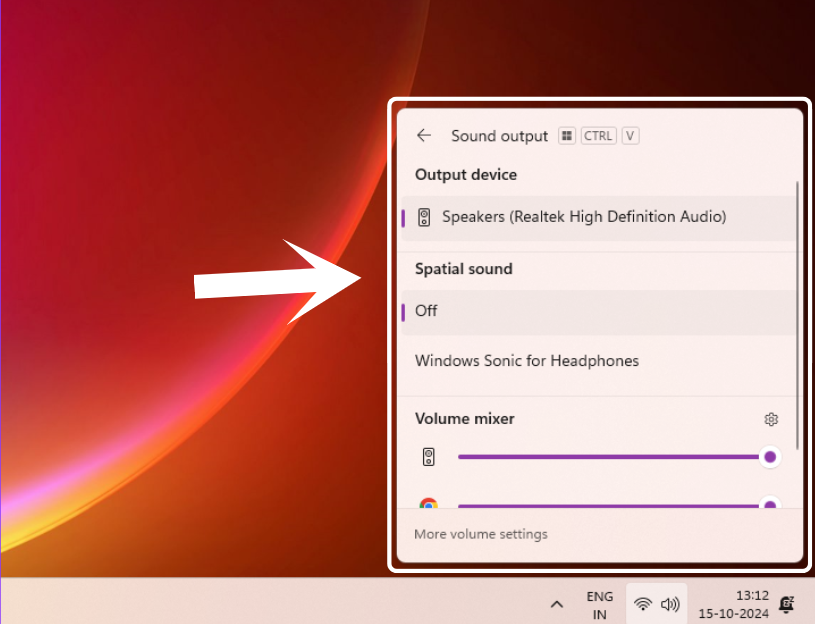
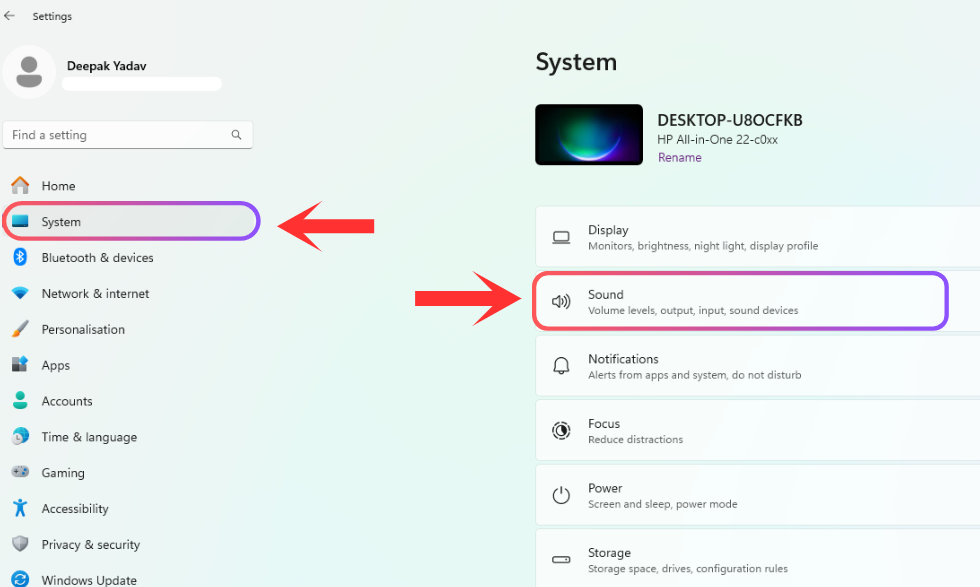
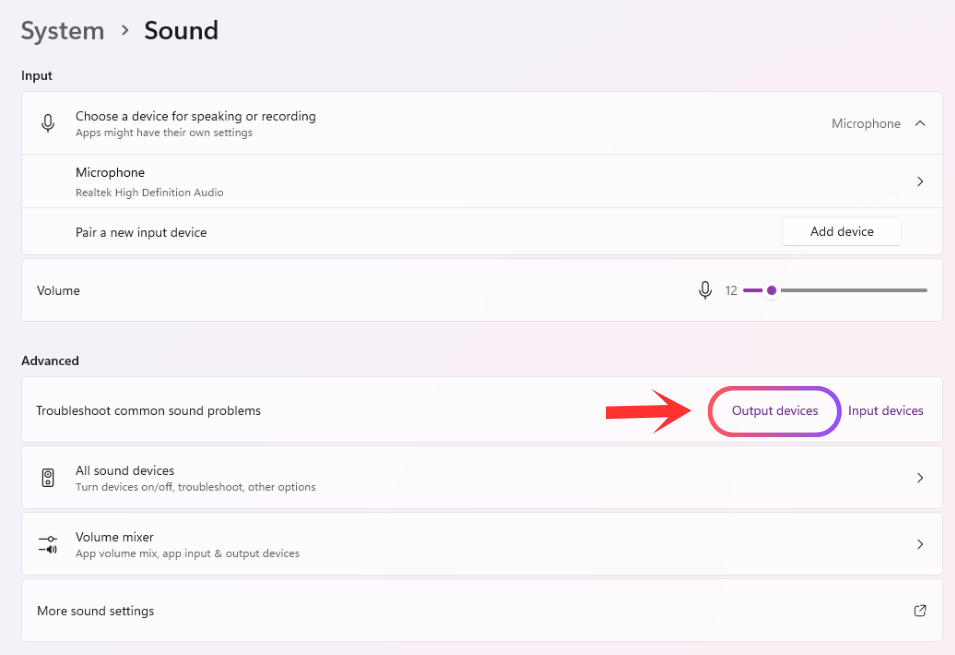
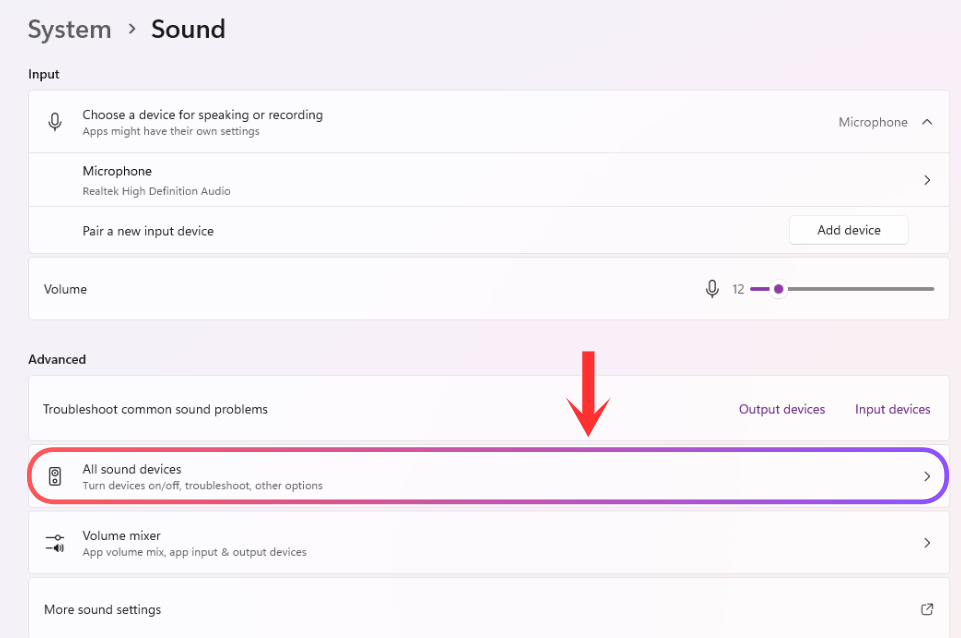
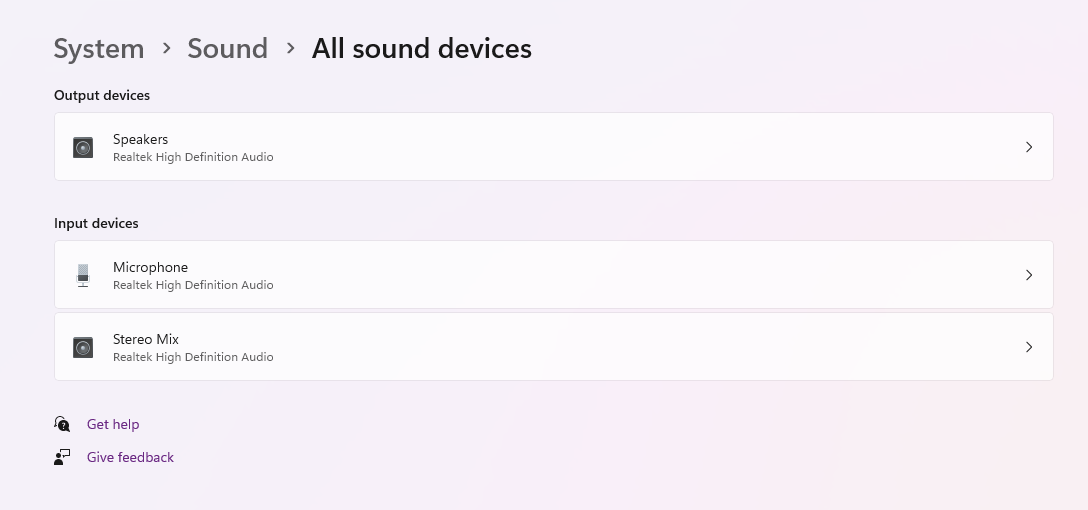
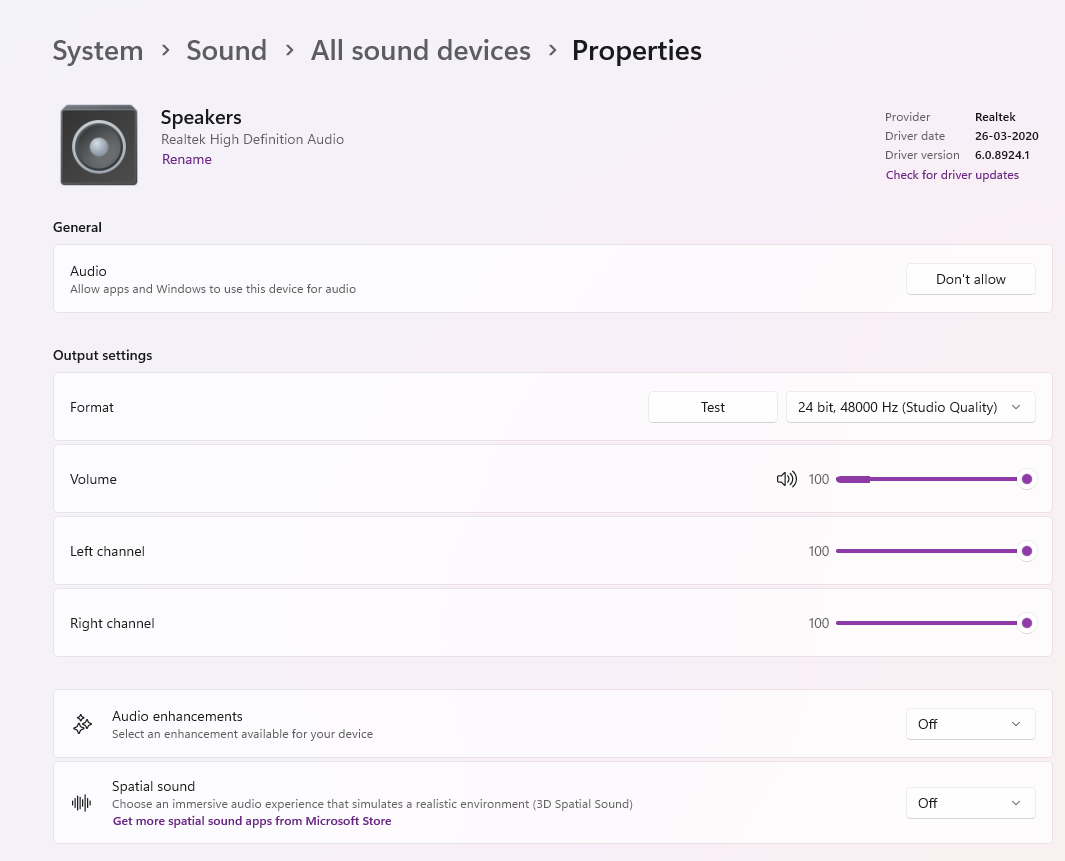
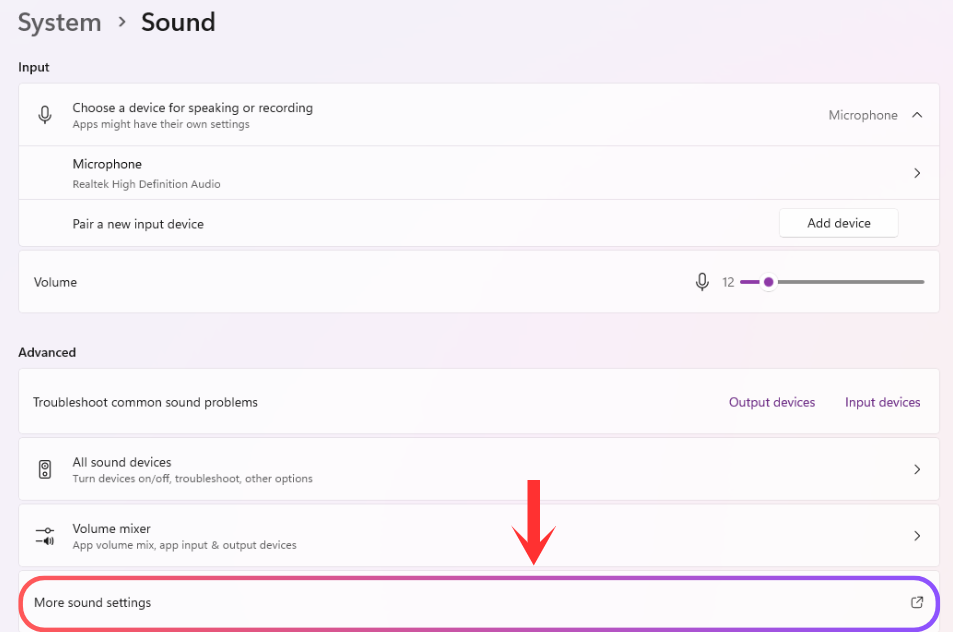
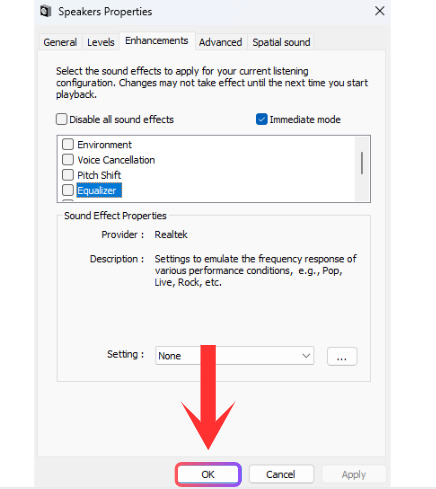
Changing the sound output in Windows 11 is simple. It enhances audio quality, supports multitasking (e.g., music on speakers, calls on headphones), and allows app-specific customization. Before adjusting your audio settings, ensure your devices are connected, recognized by your PC, and have the latest drivers installed. To make changes to your connected speakers or Bluetooth devices, follow the methods below to change the audio output for your Windows 11.

⚠️ Ensure that your audio devices are working correctly and that their drivers are up-to-date.

Deepak Yadav

10/15/2024 06:48:27
Taskbar Quick Settings (Easiest)
  1. Click the sound icon in the bottom-right corner of the taskbar. or Use Windows + A to quickly open Quick Settings for an even faster switch.

  2. In the Quick Settings panel, click the arrow next to the volume slider.

  3. Click on the sound control settings to select a sound output.

  4. Select your desired audio output device from the list.

Using Sound Settings
  1. Press Windows + I to open Settings, or directly click on the link above to open sound settings.

  2. Go to System > Sound.

  3. Under the Output section, choose your preferred audio device from the dropdown list. You can explore sound output settings.

  4. To troubleshoot the sound output device, scroll down a bit and click on the output device link labeled "Troubleshoot Common Sound Problems". It will run diagnostics that identify and fix common audio issues.

  5. Now click on All Sound Devices to view and manage all connected sound devices. Further clicking on the devices, you will get to know it's properties.

  6. Use the Volume Mixer to adjust the volume for individual applications. Mute or lower the sound of specific apps while keeping the overall system volume unchanged.

  7. Explore More Sound Settings to access additional audio settings for advanced configurations.

Rename your output devices to avoid confusion by clicking Device Properties below the output device name.

Use Control Panel (Sound Output)
  1. Press Windows + R, type control, and press Enter.

  2. Go to Hardware and Sound > Sound.

  3. Under the Playback tab, right-click the device you want to use, click on Properties, and then click on 'Enhancements'.

  4. If you want to customize the output at an advanced level, try to change it.

    Audio Setting Guide (Explore It)
    • Disable All Sound Effects:

      Disables all audio enhancements for pure sound.

    • Immediate Mode:

      Applies effects instantly without restarting playback.

    • Environment:

      Simulates different spaces (e.g., room, hall).

    • Voice Cancellation:

      Reduces or removes vocals from tracks.

    • Pitch Shift:

      Adjusts pitch without changing speed.

    • Equalizer (EQ):

      Fine-tunes frequencies with presets:

      • Live: For concert-like sound.
      • Pop: Boosts pop frequencies.
      • Club: Simulates club acoustics.
      • Rock: Highlights rock tones.
      • Bass: Amplifies low-end sound.
      • Treble: Enhances high tones.
      • Vocal: Focuses on voice clarity.
      • Powerful: Maximizes volume and impact.
      • Dance: Accentuates rhythm.
      • Soft: Smoothens harsh tones.
      • Party: Balances background music.
      • Classical: Optimized for orchestras.
      • Jazz: Enhances jazz instruments.
    • Headphone Virtualization:

      Expands soundstage for immersive headphone listening.

    • Loudness Equalization:

      Levels out volume across different audio sources.

  5. Click OK to confirm.

Go to the Properties of your audio device to adjust sample rates or enable sound enhancements for better quality.

Stereo Mix for Multi-Device Output (Advanced)
  1. Open Control Panel via Windows + R > type control.

  2. Go to Hardware and Sound > Sound, then select the Recording tab.

  3. Right-click Stereo Mix and select Enable (right-click in the window and select Show Disabled Devices if it doesn’t appear).

  4. Click Properties and navigate to the Listen tab.

  5. Check Listen to this device and choose a secondary output from the dropdown.

  6. Click Apply.

Use this method to play sound through multiple devices at once, such as speakers and headphones.

Device Manager for Driver Issues
  1. Press Windows + X and choose Device Manager.

  2. Expand Sound, video and game controllers.

  3. Right-click your audio device, choose Update Driver or Uninstall, then restart and let Windows reinstall the drivers automatically.

If audio devices are missing, choose Action > Scan for hardware changes to force Windows to detect devices.

Additional Tips
  1. Right-click the device in Control Panel > Sound > Playback > Properties > Enhancements and check Disable all enhancements.

  2. Install Virtual Audio Cable to route audio between devices.

  3. Clean audio ports with compressed air to prevent connection issues.

  4. Download NirCmd and create shortcuts to switch audio devices using: nircmd.exe setdefaultsounddevice "Device Name".

  5. Disable unnecessary HD Audio Controllers in Device Manager if issues arise.